TimeKeepers Workbench Can Repair Your Almeda Watch!

How To Have Your Almeda Watch Repaired
1. Ship your watch to TimeKeepers Workbench at 18 Market Street, Lititz, PA 17543 with your Email Address or Phone Number included.
2. Upon receiving your package we will inspect your watch and provide you an estimate.
3. Commitments to be made before the repairs are accomplished.
4. The customer is responsible for all shipping costs.
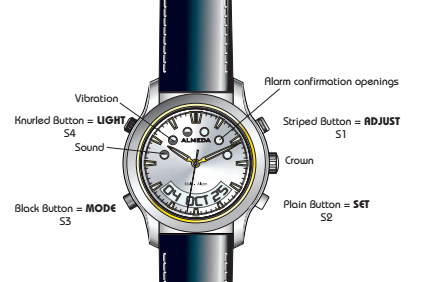
THIS ALMEDA TIME PRODUCT offers a TRADITIONAL ANALOG READOUT OF TIME with HANDS AND A
DIAL. This type of reading is preferred by a majority of people, as it is easy to read time at a glance.
THE SPECIAL FUNCTIONS are DIGITAL with numerals showing in the OPEN CRESCENT AT 6 O'CLOCK
indicating time, calendar and 6 alarms (sound or vibration to be selected). THE 6 SMALL ROUND
OPENINGS on the upper part of the dial show visually which alarms are activated and confirmed, Alarm-1 starting at left and Alarm-6 finishing at right. In addition, it shows whether the activated
ALARM IS BY SOUND (black upper half) or BY VIBRATIONS (lower black half). See illustration on the front
page.
All the digital functions are synchronized, which means the alarm settings are in relation to
the digital time setting. Most of the time the analog and the digital time should be set to the
same time. However, when traveling over different time zones the settings could be changed
as follows:
Change only the analog time to set to the new local time and leave the digital
settings at home time. This approach would be advisable for quite short trips. As
a result, all the digital settings (time, calendar and activated alarms) would stay
at home time.
Change both, analog and digital time settings to new local time, which would be
advisable for longer trips. As a result, all the other settings, such as calendar and
the activated alarms would be changed to the new local time.
1. Function Of Each Button
1.1 Black button at 8 o’clock = MODE
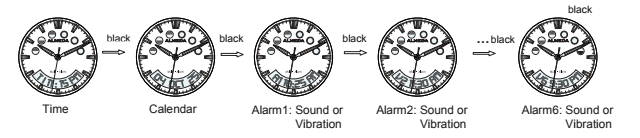
By pressing repeatedly this button, all the special functions are cycled through and are showing in the
crescent opening at 6 o’clock in the following sequence:
- Time (digital) - Calendar - Alarm1 - Alarm2 - Alarm3 - Alarm4 - Alarm5 - Alarm6
1.2 Plain button at 4 o'clock = SET
This button is used to start the settings of a function. First, push down for 2 seconds and the first pair of digits (numerals and/or letters) start flashing. For the other pairs of digits to be set just push down button shortly.
1.3.Striped button at 2 o’clock = ADJUST
This button is used to reach the desired setting for the flashing pairs of digits. In addition, this button is used to activate sound or vibration alarms and to de-activate alarms.
1.4 Knurled button at 10 o'clock = BACK LIGHT
This button is used to view digital settings in the dark.
2. Operation Manual
2.1. Time Mode
In the Time Mode:
- Press and hold THE PLAIN BUTTON (S2) for 2 seconds to enter the setting mode.
- Press THE STRIPED BUTTON (S1) to adjust or hold S1 for rapid advance.
- Press THE PLAIN BUTTON (S2) select the next item and finally exit the setting mode
- The setting sequence is shown as follows:


2.2. Calender Mode
In the Calendar Mode:
- Press and hold THE PLAIN BUTTON (S2) for 2 seconds to enter the setting mode.
- Press THE STRIPED BUTTON (S1) to adjust or hold S1 for rapid advance.
- Press THE PLAIN BUTTON (S2) to select the next item and finally exit the setting mode.
- The setting sequence is shown as follows:


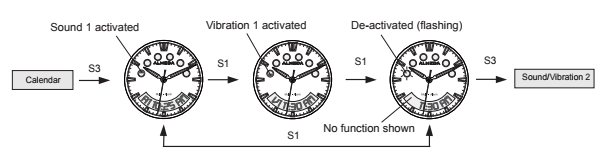
2.3. ALARM (Sound/Vibration) MODE
A) Alarm (Sound/Vibration) Mode
Before the setting of the Alarm can take place, the alarm mode has to be selected by pressing repeatedly
the STRIPED BUTTON (S1) and it cycles through SOUND ALARM (A), VIBRATION ALARM (V) and DE-ACTIVATE ALARM.
The result can be checked on 2 different displays, round openings on upper part of dial and on crescent part at
6 o’clock, showing as (A1 – A6) or (V1 – V6) or no function shown.
B) Setting Mode
Press and hold THE PLAIN BUTTON (S2) for 2 seconds to enter the setting mode.
Press THE STRIPED BUTTON (S1) to adjust or hold it for rapid advance.
Press THE PLAIN BUTTON (S2) to select the next item and finally exit the setting mode.
The setting sequence is shown as follows:

Remark:
1. The individual Alarm (Sound or Vibration) will last for 20 seconds if
this function is activated. PRESS ANY BUTTON TO STOP THE ALARM.
2. When the Alarm (Sound or Vibration) is activated, the corresponding
confirmation will be shown in the small round openings.
3. When the Alarm (sound or Vibration) is stopped, the confirmation will
flash until the 20 Sec. are up.

2.4 Analog Time
- Pull the crown out when the second-hand reaches 12 o'clock position
and the Secondhand will stop.
- Turn clockwise or counterclockwise to adjust the Hour and Minute hands
to the desired time.
- Push crown in and Secondhand will start again.

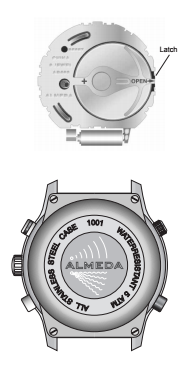
3. Battery Change
- It is strongly recommended that the battery change will be done by a Professional
- Battery number is CR 2032 (Lithium).
- If by any chance the Battery should be changed by owner, then make sure that:
A) Battery holder is unlatched with a small screwdriver ( see arrow on top of
battery holder).
B) A new battery is put in correctly (Plus Side on top).
C) Orientation of back to be the same as before changing battery.
D) Tighten the screws diagonally.
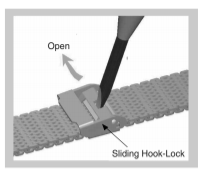
4. Adjusting Length of Metal Bracelet (where applicable)
- Release sliding Hook-Lock with small screwdriver, by inserting the blade
into the opening and to turn it as shown.
- Move Hook-Lock to the desired position and lock it again.
- Make sure when locking the Hook-Lock that it rests inside of a detent on the
underside of the bracelet.
- It is recommended that this operation should also be done by a Professional.
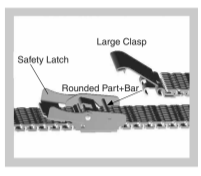
5. Open and Close the Bracelet Clasp (where applicable)
-To Open:
- Lift Safety Latch (with ALMEDA engraved)
- Lift and hold large Clasp and disengage it from the bar on the
sliding lock.
-To Close:
- Hold large Clasp and engage rounded parts over the bar and
close clasp.
- Push down Safety Latch (with ALMEDA engraved).
6. Specifications
- Analog/Digital Timepiece with up to 6 Alarms (Sound or Vibration) and Auto Calendar until 2099.
- Case, Bracelet and Chain are produced in High Grade Stainless Steel (316L).
- Watch is tested for 5 ATM (165 feet) water pressure and can be used for showers and swimming.
However watch has to be tested after battery replacement, to guarantee that all the seals are in
place and functioning properly.
- Scratch-resistant domed Mineral crystal with anti-glare treatment to assure excellent readability
of time and functions under any type of lighting.
- Battery life: Depending upon the number of daily alarms set. Shortest battery life is with all 6 vibration
alarms activated, in which case the battery will last between 6-8 months. By using only 3 vibration
and 3 sound alarms, battery life increases to 1 year or better.
- Battery is Lithium type CR 2032, which is readily available in electronic or other specialty stores.
- Size: W1.55" x L1.85" x H0.55"
- This watch series was designed and developed in the US and is manufactured in China.
7. Frequently Asked Questions
- HOW LONG DOES A BATTERY LAST?
Depending upon the number of alarms activated, especially the vibration alarm. Minimum battery life
is 6 - 8 months and maximum battery life is over 1 year.
- HOW DO I KNOW THAT IT IS TIME TO REPLACE THE BATTERY?
When vibration alarm starts low vibrations it is time to replace the battery, which can be done by a local
jewelry store, department store or similar. Always use correct battery type which is Lithium 3 volt CR 2032.
- IS THIS WATCH WATER RESISTANT AND WHAT DOES IT MEAN?
Every watch is tested to a water pressure of 5 ATM (165 feet) before leaving the factory. Therefore it can be
used for the shower and for swimming. However, when changing the battery, the watch should be checked
again for water resistance by the store who replaces the battery. If this is not done there is a danger that the
watch will leak when exposed to water.
- HOW CAN I GET SERVICE IF NEEDED AND CAN I GET SPARE PARTS?
Timekeepers Workbench will gladly service and repair your Almeda Watch.
- CAN I RETURN MY WATCH FOR ANY REASON?
For the first 30 days from the invoice date, you can return your watch for exchange or refund.
8. Almeda Quick Setting Instructions
To Set Time:
- Pull crown and set hands to correct time.
- Press Mode button (black) repeatedly until TI (Time) appears in crescent
window.
- Press Set button (plain) for at least 2 sec. until Hour Num. start flashing.
- Press Adjust button (striped) until correct hour is reached.
- Press Set button (plain) again shortly and Min. Num. start flashing.
- Press Adjust button (striped) until correct Min. are reached.
- Press Set button (plain) again shortly and AM/PM start flashing.
- Press Adjust button (striped) to select AM or PM.
- Press Set button (plain) again shortly and time is completely set.
To Set Calendar:
- Press Mode button (black) until year/month/date appear in crescent
window.
- Press Set button (plain) for at least 2 sec. until Year Numerals start
flashing.
- Balance of procedure is the same as shown in how to set time.
To Set Alarms (Sound or Vibration)
- Press Mode button (black) until A1, V1 or nothing appears on left side of
crescent window. However round confirmation opening will blink to indicate
which alarm was reached.
- Press Adjust button (striped) to select sound (A1), vibration (V1) or to de-
activate alarm.
- Press Set button (plain) for at least 2 sec. until Hour Numerals start
flashing.
- Balance of procedure is the same as shown in how to set time.
- For A2/V2 to A6/V6 follow the same procedure as for A1/V1.
Backlight:
- Press Light button (knurled) to illuminate the digital readouts in the dark.
- Lights up for 3 seconds. Use sparingly as it uses quite a lot of energy.